| 失效链接处理 |
|
Vue 2.0中生命周期与钩子函数的一些理解 PDF 下载
本站整理下载:
相关截图:

主要内容:
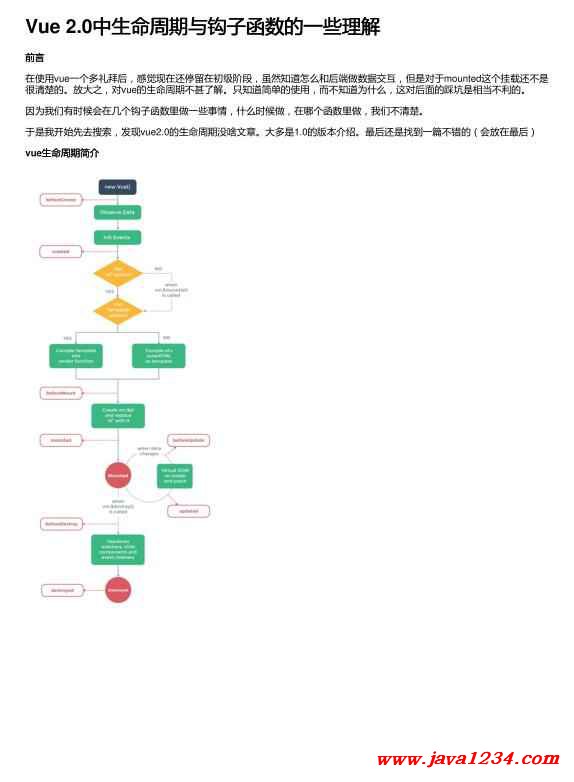
生命周期探究 生对于执行顺序和什么时候执行,看上面两个图基本有个了解了。下面我们将结合代码去看看钩子函数的执行。 ps:下面代码可以直接复制出去执行 <!DOCTYPE html> <html> <head> <title></title> <script type="text/javascript" src="https://cdn.jsdelivr.net/vue/2.1.3/vue.js"></script> </head> <body> <div id="app"> <p>{{ message }}</p> </div> <script type="text/javascript"> var app = new Vue({ el: '#app', data: { message : "xuxiao is boy" },beforeCreate: function () { console.group('beforeCreate 创建前状态===============》'); console.log("%c%s", "color:red" , "el : " + this.$el); //undefined console.log("%c%s", "color:red","data : " + this.$data); //undefined console.log("%c%s", "color:red","message: " + this.message) },created: function () { console.group('created 创建完毕状态===============》'); console.log("%c%s", "color:red","el : " + this.$el); //undefined console.log("%c%s", "color:red","data : " + this.$data); //已被初始化 console.log("%c%s", "color:red","message: " + this.message); //已被初始化 },beforeMount: function () { console.group('beforeMount 挂载前状态===============》');
console.log("%c%s", "color:red","el : " + (this.$el)); //已被初始化 console.log(this.$el); console.log("%c%s", "color:red","data : " + this.$data); //已被初始化 console.log("%c%s", "color:red","message: " + this.message); //已被初始化 },mounted: function () { console.group('mounted 挂载结束状态===============》'); console.log("%c%s", "color:red","el : " + this.$el); //已被初始化 console.log(this.$el); console.log("%c%s", "color:red","data : " + this.$data); //已被初始化 console.log("%c%s", "color:red","message: " + this.message); //已被初始化 },beforeUpdate: function () { console.group('beforeUpdate 更新前状态===============》'); console.log("%c%s", "color:red","el : " + this.$el); console.log(this.$el); console.log("%c%s", "color:red","data : " + this.$data); console.log("%c%s", "color:red","message: " + this.message); },updated: function () { console.group('updated 更新完成状态===============》'); console.log("%c%s", "color:red","el : " + this.$el); console.log(this.$el); console.log("%c%s", "color:red","data : " + this.$data); console.log("%c%s", "color:red","message: " + this.message); },beforeDestroy: function () { console.group('beforeDestroy 销毁前状态===============》'); console.log("%c%s", "color:red","el : " + this.$el); console.log(this.$el); console.log("%c%s", "color:red","data : " + this.$data); console.log("%c%s", "color:red","message: " + this.message); },destroyed: function () { console.group('destroyed 销毁完成状态===============》'); console.log("%c%s", "color:red","el : " + this.$el); console.log(this.$el); console.log("%c%s", "color:red","data : " + this.$data); console.log("%c%s", "color:red","message: " + this.message) }})</script> </body> </html> create 和 mounted 相关相 咱们在chrome浏览器里打开,F12看console就能发现 beforecreated:el 和 data 并未初始化 created:完成了 data 数据的初始化,el没有 beforeMount:完成了 el 和 data 初始化 mounted :完成挂载 另外在标红处,我们能发现el还是 {{message}} ,这里就是应用的 Virtual DOM(虚拟Dom)技术,先把坑占住了。到后面 mounted挂载的时候再把值渲染进去。
|


 苏公网安备 32061202001004号


